CBC-PROC-025 Version 12 last review date: Sep, 2020
1. Downloading the App
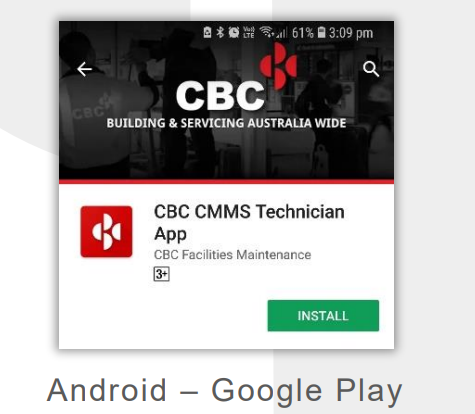
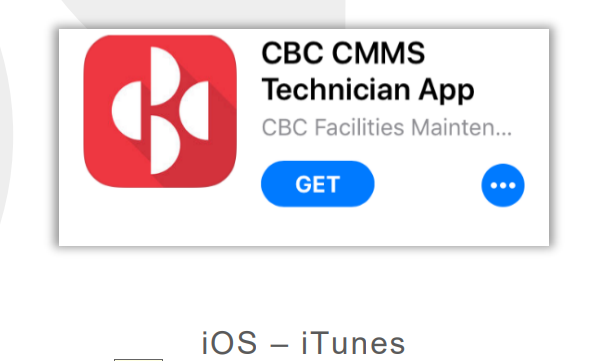
1.1 Android & iOS
- Navigate to the Google Play Store or the Apple App Store.
- Search for ‘CBC CMMS Technician App’ or tap the below link.
- Download and Install the App.
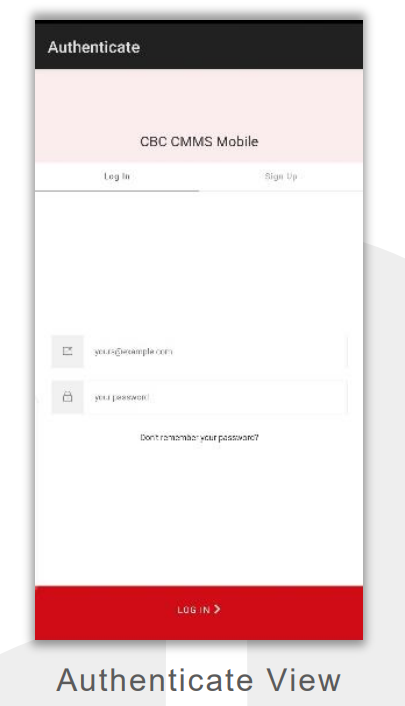
2. Signing In (Authentication)
Launch the App.
Tap the ‘Login’ button.
Enter your username and password and tap ‘Log In’
- If you have received a ‘Verify Your Account’ email, but have not reset your password, please utilise the ‘Don’t remember your password?’ link to create a new password for yourself.
- If you have forgotten your password, you can utilise the ‘Don’t remember your password?’ process.
- If you do not yet have a username, contact your CBC Facility Coordinator or CBC Contract Manager.
- For guidance on saving your password for use during future logins, see Saving your Password
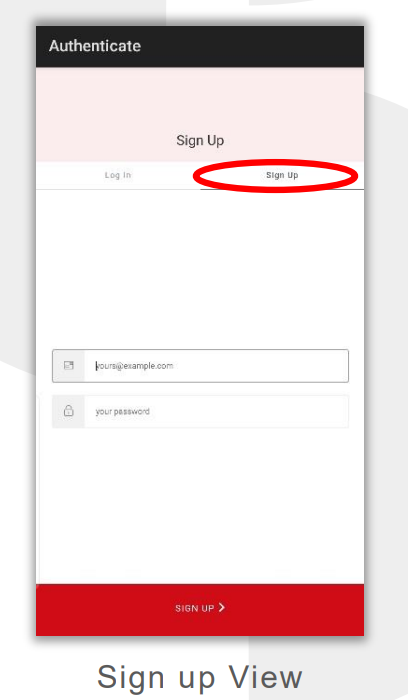
3. Sign up as a new user and provide profile information
If you do not yet have an account in CMMS yet, you can utilise the Sign Up option to create a new account. You will then be prompted to provide user information. Please note, before access to Work Orders can be granted, CBC will review the information provided and confirm your account.
Note: If you are an existing CBC provider or technician, it is likely we have already set you up in CMMS, but have not enabled your account to login due to not having an email address to use as your username. If you feel this is the case, please contact the CBC Helpdesk and request that they review your profile, add an email address if necessary, and activate it for login.
3.1 From the Authenticate screen, tap ‘Sign up’.
3.2 Enter your email address and password, then tap ‘Sign up’.
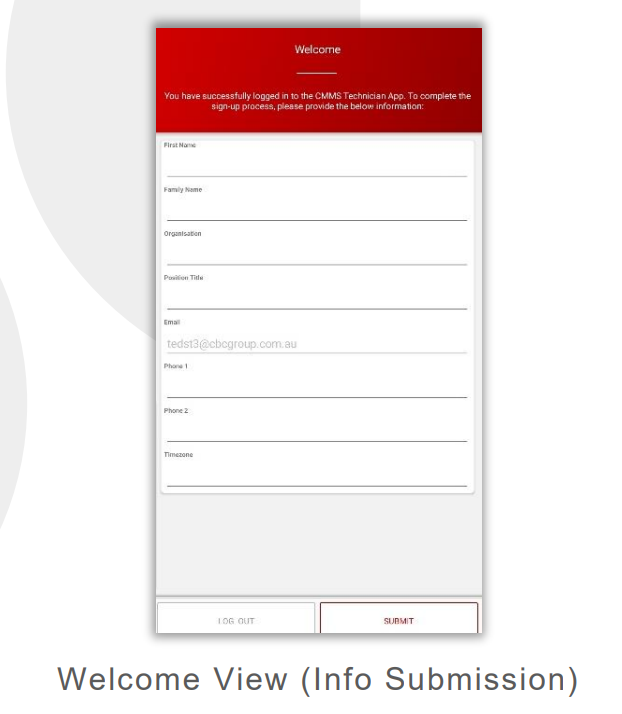
3.3 From the Welcome view, fill the new sign account details provided.
3.4 Tap ‘Submit’.
4. Reviewing and Accepting Policies
4.1 Read through the policy.
4.2 Tap the ‘I have read and accept the (policy name)’ selector.
4.3 Tap ‘Accept’.
- Policies may be updated from time to time. If a new revision of a policy is released, you will be required to review and accept it on your next login.
- Rejecting the policy will prevent further access to the App

5. Accessing the CBC Portal
Your account with CBC CMMS can be used with the CMMS Technician App as well as the CMMS Portal. You can access the CMMS Portal with any modern web browser, including on mobile devices, via this link:
https://cmms.cbcgroup.com.au (opens in a new tab)
In most cases, it isn’t necessary for technicians to make use of the CMMS Portal. It is useful for reviewing your User Profile to submit user qualifications. The CMMS Portal can also be accessed inside the Technician App.
6. Accessing your User Profile and reviewing Qualifications / Inductions
To attend sites on behalf of CBC, all required qualification documents must be submitted to and accepted by CBC. When reviewing work orders, you may see the ‘Not Qualified’ label. This means you are yet to provide all required items to attend site.
Follow the below process to submit the required items to CBC
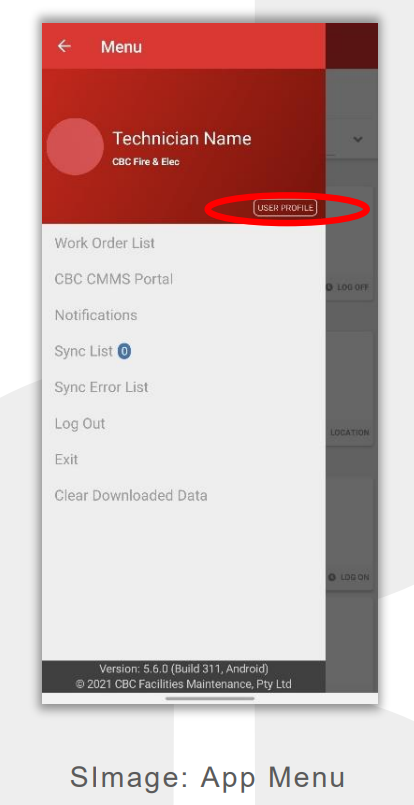
6.1 Accessing your Profile
- Tap on the Menu Icon (three lines (Android), or ‘Menu’ (iOS)) on the top left-hand corner to view the Menu Panel, or swipe from the left edge of the screen.
- Tap on the ‘User Profile’ button to navigate to your profile.
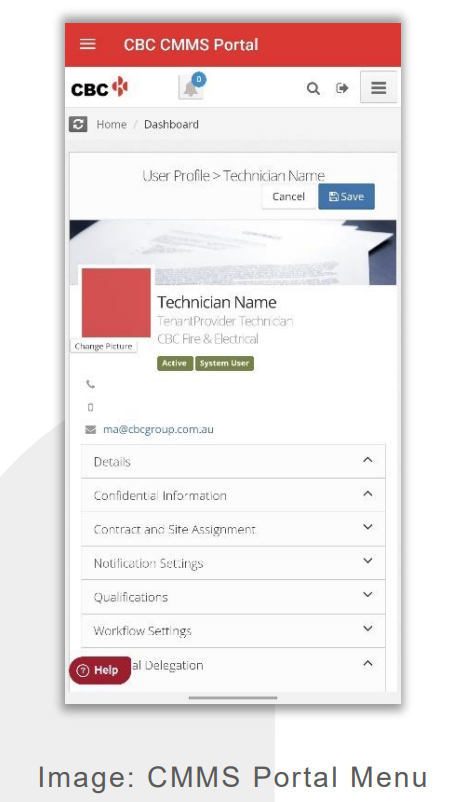
6.2 Reviewing your Qualifications
- On the User Profile view, tap on Qualifications to expand the Qualification Panel.
- The Qualification Panel contains two tables. The first table list all your Qualifications currently in CMMS. The second table lists the Required Qualifications to be submitted.
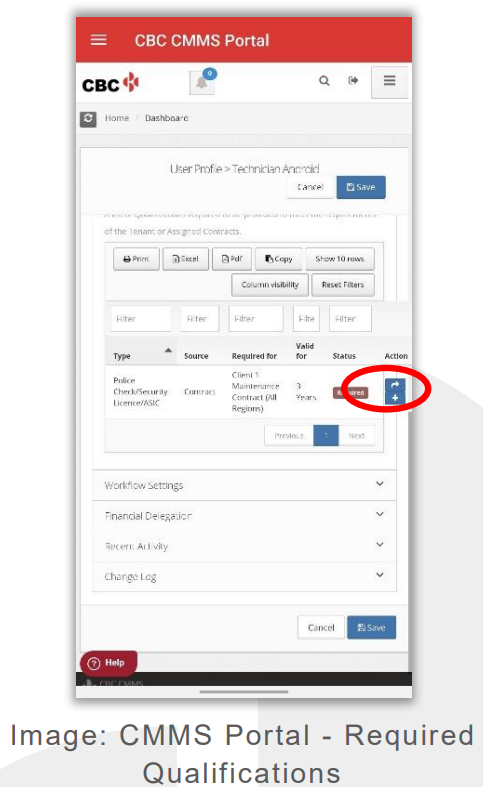
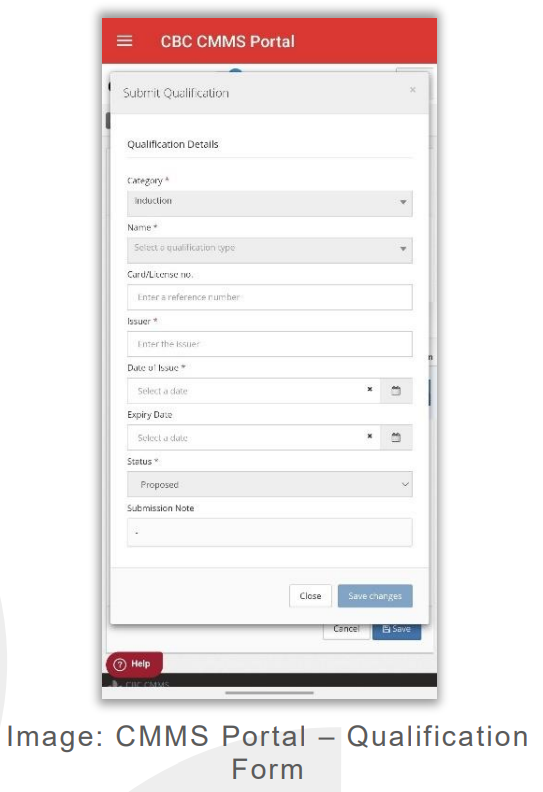
6.3 Submitting Required Qualifications
- If any items are listed in the Required Qualification table, these items should be submitted to CBC for review, via the CMMS Portal.
- For each required item, there may be a ‘Download Form’ or ‘Follow Link’ button, either downloading the form to be completed, or taking you to a website.
- Complete the form or induction, saving the form or evidence to your device.
- Once the Qualification is ready to upload, tap the blue ‘ + ’ icon to upload the required document. The Submit Qualification form will open, allowing the details to be entered and the document submitted.
- Fill out the form, ensuring all mandatory fields are completed.
- Tap on the Dropzone to browse the files on your device. Select the appropriate document and tap ‘Save Changes’ to submit the qualification for review.
- The status of the Qualification will remain as ‘Proposed’ until CBC have reviewed and accepted the submission.
7. App view Descriptions
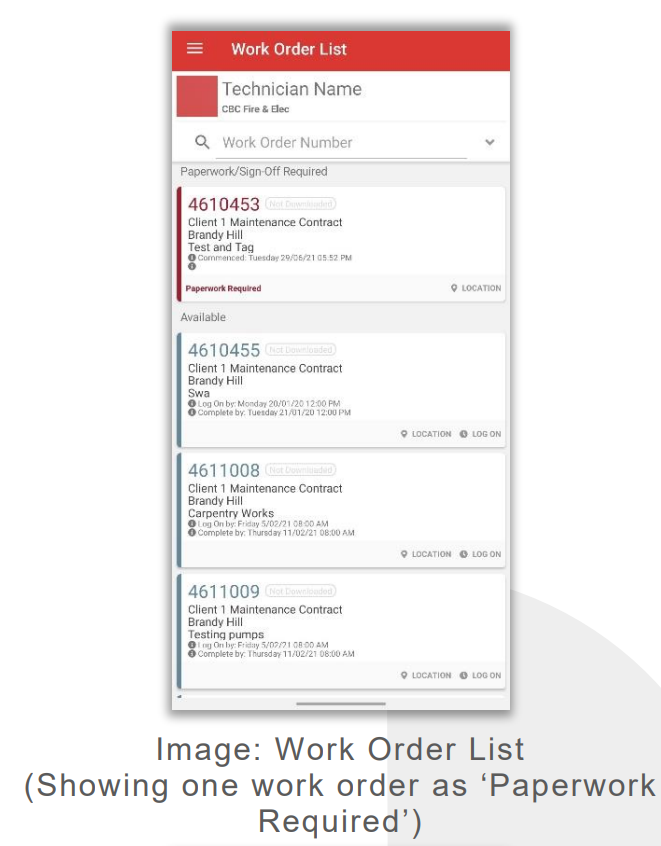
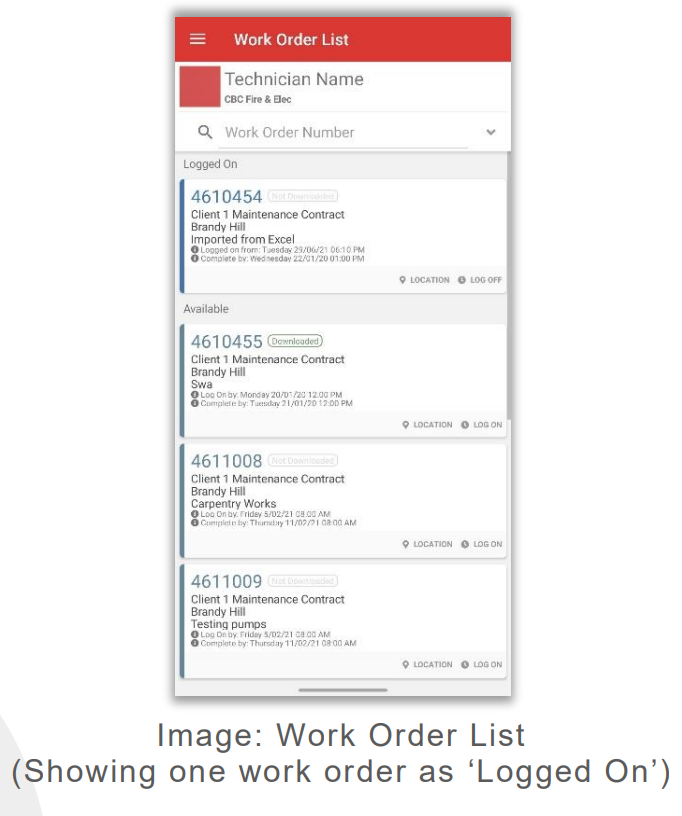
7.1 Work Order List
After logging in and accepting policies, this is the main view.
The Name Panel shows the name, photo and Parent of the currently logged in user.
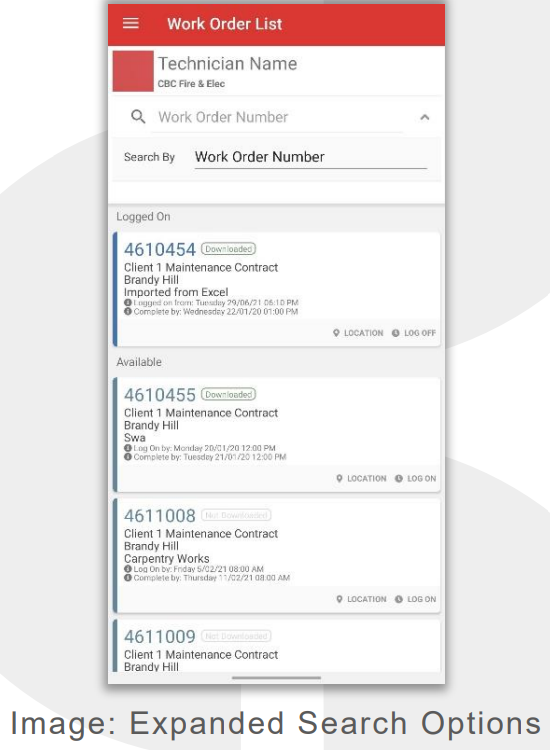
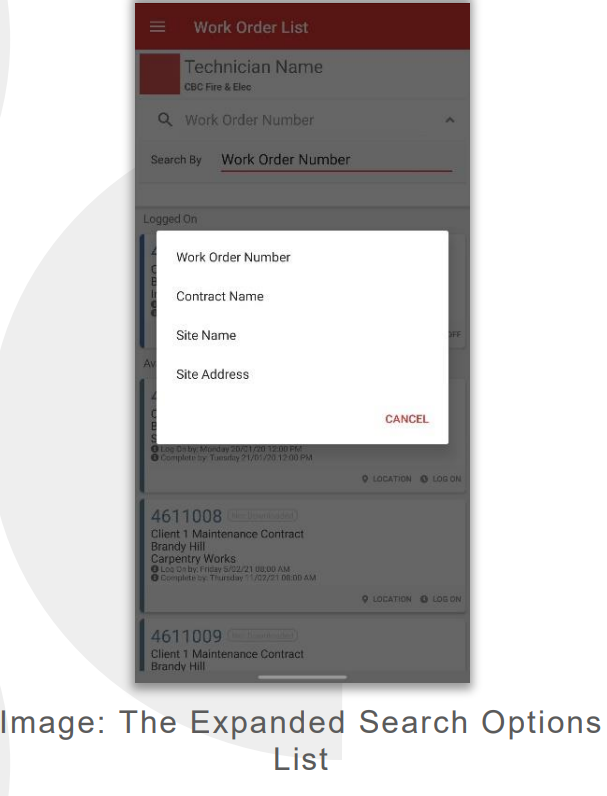
The Search field allows for work order(s) to be found by Work Order number.
Tap the down arrow to expand the search options. Further search options allow the user to search Work Orders by Contract, by Site name, and by Site Address.
The Work Order List displays all work orders available to the user (based off Parent, and Contract and Site assignment), with special sections for ‘Logged On’ , ‘Incomplete’, ‘Paperwork Required’ and ‘Complete, Paperwork Awaiting Approval’. Ten Work Orders are displayed at a time. Tap the ‘Show More’ button to load the next ten.
Tap ‘Location’ to be taken to google/apple maps, with travel directions to the site.
Tap ‘Log On’ to log on to that work order.
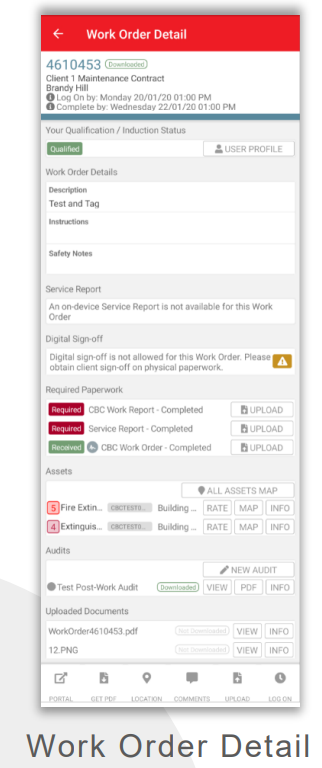
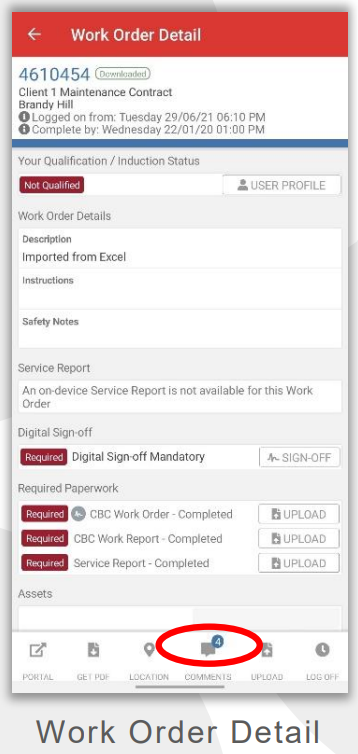
7.2 Work Order Detail
- Displayed when a Work Order is selected from the Work Order List.
- Shows more detailed information about the work order and provides access to additional functions.
- Shows a label indicating your Qualification / Induction status for this site. If ‘Not Qualified’ appears, refer to: 6. Accessing your User Profile and reviewing Qualifications / Inductions
- Actions:
- Download PDF: Downloads a PDF copy of the work order to your device.Location: Opens google/apple maps with directions to the site.
- Log On / Off: Log On or Off the work order.
- Upload Document: Opens the Upload Document view, allowing the user to upload paperwork.
- Visit Portal: Opens the full CBC Portal view of the Work Order. Additional functions may be available here.
- Comments: Add and view Comments. For more details see 9. Adding and Viewing comments on a Work Order
- Induction Status: Indicates whether the technician has provided all necessary qualification/induction documents to perform the work. Tap the ‘User Profile’ button to navigate to the User Profile in the CMMS portal to review current or outstanding qualification items.
- Work Order Description: ‘Description’, ‘Instructions’ and ‘Safety Notes’ provide important information for Technicians regarding the Work Order.
- Service Report: Displays whether a Service Report is available for the Work Order. If a Service report is available, the technician can complete the Service Report on the App.
- Digital Sign Off: Indicates whether the Work Order requires digitally signoff for the Work Order. If required, the technician can capture a digital signature on the app from the client and for themselves.
- Required Paperwork: List of Document Types required to be submitted to satisfy completion of the Work Order.
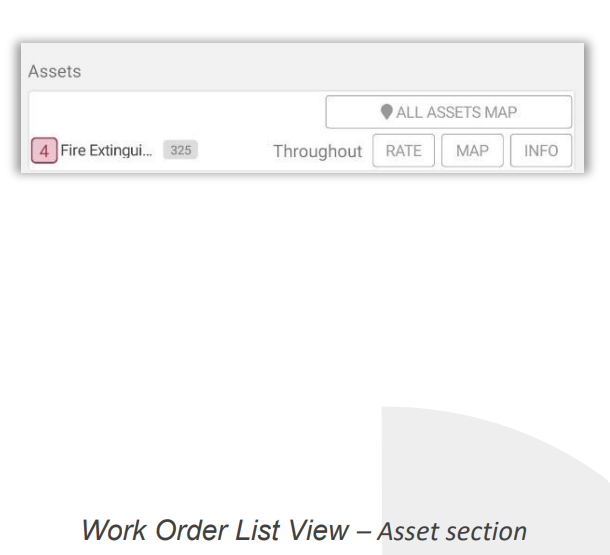
- Assets: A list of Asset(s) which are linked to the Work Order.
- ‘All Assets Map’ button: Displays a map showing GPS locations of all associated Assets, where location data is available.
- Rate: Allows users to propose a Condition Rating for each asset.
- Map: Displays a map with the GPS location of the Asset and allows you to submit a GPS location.
- Info: Displays more information about the asset such as Asset Name, Asset Type, Primary ID, Client Asset ID, Asset Criticality, current Condition Rating, Physical location, Manufacturer, Model, and Serial Number.
- Audits:
- ‘New Audit’ button: Allows user to perform an Audit. Select a template from those available for the Work Order.
- List of Audits: Displays all Audits associated with the Work Order.
- Uploaded Documents: Documents already uploaded to the Work Order. These documents can be downloaded to your device by selecting ‘Download’. Selecting ‘Info’ will provide extra information about the uploaded documents. (Uploaded Document Type, Title, Date uploaded, Document status, Owner and User).
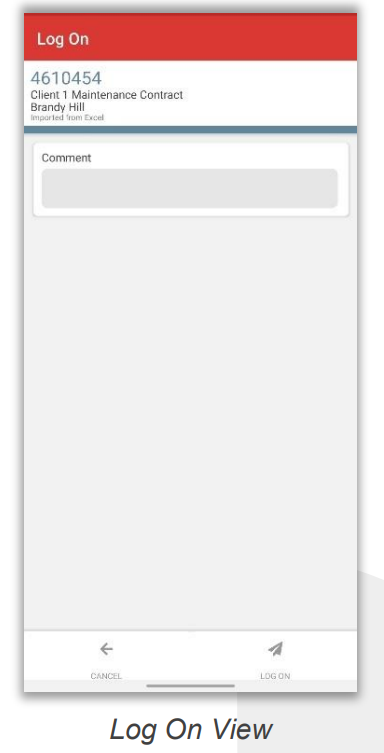
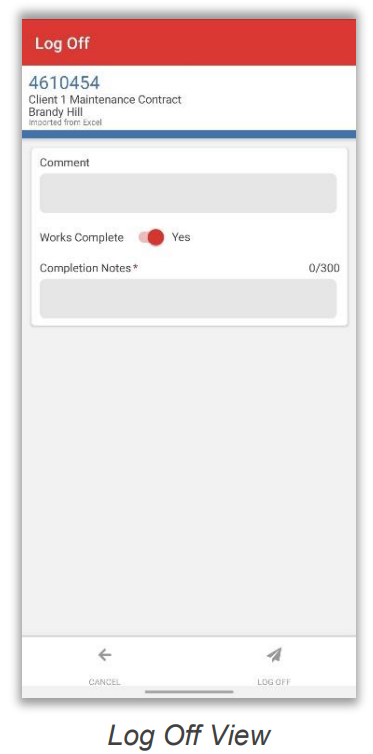
7.3 Log On/Off
- The topmost Work Order details panel provides a brief reminder of the Work Order you are about to log on or off.
- The Comment field is optional when logging on or off.
- Tick the Works Complete checkbox to indicate that the works are complete. If works are not complete and attendance is required again, log off without ticking the Works Complete checkbox (the Work Order will remain outstanding).
- When logging off, Completion Notes is a mandatory field. It is expected that a brief note detailing the work undertaken is entered, such as:
- “Scheduled maintenance completed”
- “Replaced faulty motor, fan now operational”
- “Investigated faulty pump. Quote required to replace”
- Tap the ‘Log On’ or ‘Log Off’ button to complete the action.
- Note: Your device Location Service (GPS) should be switched on so it can be confirmed that you are onsite at the time the action occurs.
- Note: If you need to Log On or Log Off and you are not on site, such as if you have forgotten to log off, you will need to contact the CBC Help Desk to perform the action.
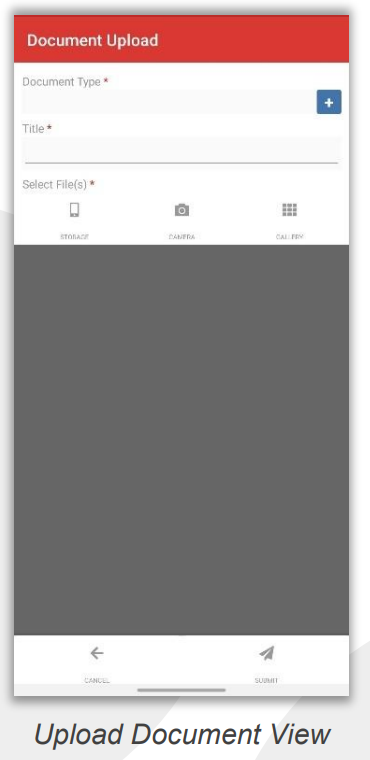
7.4 Upload Document
- Documents for Work Orders can be upload via two methods.
- Upload via Required Paperwork section. From the Required Paperwork section, required documents types are listed for the Work Order. Tap the ‘Upload’ button for the respective document type to start uploading the documents.
- Upload via ‘Upload’ button on the bottom actions bar. From the action bar, tap the ‘Upload’ button to start uploading the documents. This feature is useful when the document type you wish to upload is not a Required document for the Work Order, such as a photo or compliance certificate.
- Each document uploaded requires the following fields to be completed:
- Document Type: Select an appropriate Document Type by tapping the ‘ + ‘ button. Multiples can be selected if your file has multiple pages covering multiple Document Types. It is suggested you review the ‘Required Documents’ for the work order so you can select matching types, to ensure that all required documentation is provided.
- Title: Enter a title for the document. This field will be pre-populated from the selected file, if it is blank when a file is selected.
- Select File(s): Select file(s) from the one of the options below or multiple options can be utilised for when uploading multiple files.
- Storage: launches a file browser to select a file via Internal storage or Cloud storage.
- Camera: launches the device camera to allow you to take a photo.
- Gallery: launches the device gallery to allow you to select an existing photo.
- See Additional Apps for handy applications that can be used to produce PDF’s of physical paperwork using your device camera.
- Uploaded documents can include anything needed to be attached to a Work Order, including photos, safety documentation, audits, and completed paperwork. A summary of the Document Type you should select for these documents is included below
| DOCUMENT TO UPLOAD | DOCUMENT TYPE TO SELECT |
|---|---|
| A photo of damage or completed work. | Photo |
| Safety related documentation, such as JSA’s, SWMS, or Take Two’s. | OHS |
| A completed Service Report | Service Report – Completed |
| An electrical or plumbing certificate | Compliance Certificate |
| The completed CBC Work Order | CBC Work Order – Completed |
| The completed CBC Work Report | CBC Work Report - Completed |
Tap ‘Save’ to complete the action.
- Tap ‘Cancel’ to return to the Work Order Detail view.
- A single uploaded document can have multiple Document Types associated with it.
- All submitted paperwork is reviewed by CBC administrative staff.
Android Devices: To upload documents from your device Internal Storage you may need to adjust a setting in the Android file explorer. See the below guide: 11. Android Devices: Accessing Device Internal Storage
8. Completing Work Orders
8.1 Use the Search function on Work Order List to find the work order you wish to complete.
8.2 Tap the Work Order number to bring up the Work Order Detail.
8.3 Tap ‘Download PDF’ to retrieve a copy of the Work Order.
8.4 Tap ‘Log On’ to bring up the ‘Log On’ view. Enter comments if required, and tap ‘Log On’ to commence work.
- Note: You must be within a set distance of the site to log on, or the log on action may fail. The location of the site can be reviewed by tapping the ‘Location’ button.
- Note: If you did not complete the log on action when you actually started, you will need to contact the CBC Helpdesk, so they can log you on at the correct time.
- Note: If you have not provided all necessary Qualification/Induction material, the log on process may fail.
8.5 Complete the work as detailed on the work order.
8.6 Complete the necessary paperwork.
- Paperwork required to be completed will be listed on the Work Order Detail view. Where additional paperwork is required, such as electrical certificates or testing results, these may be listed in the work order description.
- Paperwork can be completed electronically, which may include capturing the site representatives signature on the Work Order pdf.
- Use a PDF signing App (such as Adobe Fill & Sign, described below) to digitally sign paperwork.
8.7 Upload paperwork by tapping the ‘Upload Document’ button.
- Review the steps required on the Upload Document view description above.
- Upload a document for each noted Required Document.
- Use your camera or Office Lens (described below) to photograph your paperwork.
- Note: All submitted paperwork is reviewed by CBC administrative staff.
8.8 Complete Digital Sign-Off.
- Where necessary, capture your signature and that of a client representative via the app.
- Please refer to Digitally Signing-Off a Work Order for further detail regarding the Digital Sign-Off process.
8.9 Tap the ‘Log Off’ button to bring up the log off view. If works are complete, ensure the
‘Works Complete’ toggle is checked. Tap the ‘Log Off’ button to complete the log off action.
- Add comments as necessary.
- If works are complete, the Completion Notes field must be populated.
8.10 Once the works are complete and all required paperwork has been reviewed and accepted
by CBC, it will no longer appear in the Work Order List.
9. Digitally Signing-Off a Work Order
Depending on Contract requirements, Digital Sign-Off is either: Not Allowed: Digital Sign-Off is not accepted for the Work Order. Technicians should capture their own and the client’s signature on physical paperwork as normal. Allowed: Digital Sign-Off via the app is accepted for the Work Order but is not mandatory. If Digital Sign-Off is not obtained from the client, then the client signature must be captured on physical paperwork as normal. Mandatory: Digital Sign-Off is mandatory. You are required to capture client signoff via the app, alongside your own signature.
9.1 Capturing Digital Sign-Off
- From the Work Order Detail view, tap ‘Sign-Off’ to bring up the Work Order Sign-off view.
- Select a Confirmation Prompt from the list. By default, this will be ‘Technician Attendance’, which indicates that the sign-off being obtained relates to the attendance of the technician, and not any other related action, such as the client being provided with a list of faults.
- Type the client’s name on the Client Name field and tap the ‘Done’ button.
- Tap on the ‘Tap to Sign’ box to bring up the Signature Capture view.
- Sign in the designated signature capture area, then tap ‘Accept’.
- Repeat the signature capture step for both yourself (the technician), and the client.
- You can tap a signature to re-capture that signature if necessary.
- Tap the ‘Submit’ button.
- Note: Once a Client has signed off, it is not possible to change any details of the sign off, such as the Confirmation Prompt or Client Name. If changes are required, tap the back button to cancel the sign-off and start a fresh sign-off.
9.2 What to do if the Client is not available to sign off
On some occasions, a client representative will not be available to sign off. If this is the case, an option is available to specify why the sign off was not obtained.
Concerted effort must be made to obtain the client signature. Use of the ‘Client Unavailable’ option will be investigated to ensure it is only used when appropriate.
On the Sign-Off View, tap the ‘Client Unavailable’ toggle. This will remove the signature capture option and provide a dropdown to select the applicable reason you are unable to obtain the client signature.
- Select a ‘Client Unavailable’ option from the list.
- Provide further detail in the text field.
- Continue to capture your own signature and submit the Digital Sign-Off as per Capturing Digital Sign-Off.
10. Adding and Viewing comments on a Work Order
10.1 From the Work Order view, tap ‘Comments' to bring up the Comments view.
- This will bring up the Comments view, showing any existing comments and allowing you to add your own comments.
- If comments have already been added to the Work Order, a badge indicating how many will be visible next to the Comments action.
10.2 If necessary, tap the ‘Choose comment type’ dropdown and select one of the available ‘Add Comment’ options.
10.3 Tap on the Comment box to begin typing your Comment.
10.4 Enter your comment in the field provided and tap the ‘ADD’ button.
- Your comment will be added to the event stream.
Comments may be useful to provide instructions for technicians when they are attending sites and Technicians can also leave comments for other Technicians as provide instructions for work in progress.
11. Completing a Service Report
11.1 What is a Service Report?
- A Service Report is a question set checklist that allows technicians to perform an asset inspection and attach it to a Work Order digitally. This can satisfy the ‘Service Report’ document requirement for certain Work Orders, usually Scheduled Work Orders.
- Question Sets will be specific to an asset and likely come from a scope document or an Australian Standard, such as AS1851-2012.
11.2 How to complete a Service Report
Navigate to the Work Order Detail view.
Note, only some Scheduled Work Orders will have a Service Report available.
From the Work Order Detail view, tap the ‘Download’ button on the Service Report section.
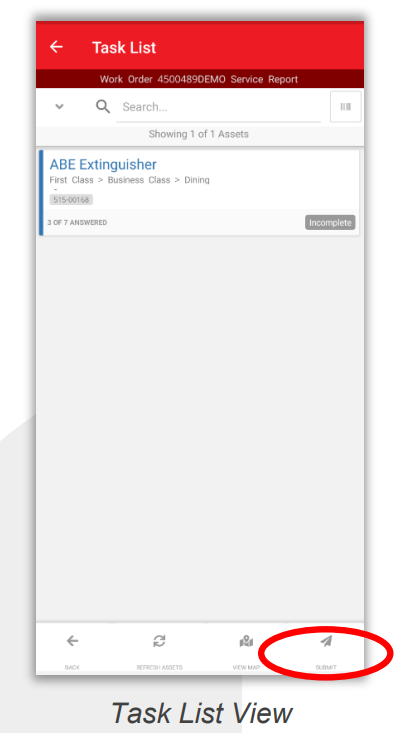
When the Service Report is downloaded (a green ‘Downloaded’ tag will appear), tap the ‘Commence’ button to launch the Task List view, which will display a list of all the assets for the Service Report.
Search the Asset you wish to perform Service Report via Search field, the asset can be selected via below options:
Via Task List - Select the Asset from the Task List and tap the Asset to navigate to the Question List view.
Via Task Search - Enter an Asset ID, Asset name and Asset location and tap on the Asset to navigate to Question List and tap on the Asset to navigate to Question List
Via Barcode reader – tap the ‘barcode’ button next to the search field. This will open the barcode reader so you can scan the barcode of an asset. Barcodes scanned act as search text, so if the scanned number exists as an ID of an asset, the Task List will be filtered to show it.
Tap on the Asset to navigate to the Question List view.
For each Asset, read and complete each question.
Tap the ‘Save’ button to save changes and return to the Task List view.
Saving a Service Report does not automatically submit it to CBC, it only saves it locally to your device. See the below instructions for submitting the Service Report.
11.3 Response Types and Valid Responses
| RESPONSE TYPE | VALID RESPONSE |
|---|---|
| Multiple Choice Responses | Select a response from the pre-defined choices. If a ‘Fail’ response is selected, you will be required to provide detail of the failure in the text field. An attachment such as a photo, can also be added to fail responses. |
| Text Response | Enter a response with any keyboard characters. |
| Number Response | Enter a response with any numeric characters. Decimals, minus and 0 values are valid. |
| Photo | Tap the upload button to select a valid image file. Multiple photos may be uploaded. |
| Date response | Enter a valid date. |
| Signature | Capture a signature and enter a name. |
11.4 How to Submit a Service Report
Service Reports can be submitted even if incomplete. You can return to it again and continue at any time. Such as the following day. Logging off and back on will not affect the progress you have made.
Only once all questions have been answered and submitted will the Service Report be converted to an attachment on the Work Order and satisfy required documents.
When you are ready to submit the Service Report, tap the ‘Submit’ button on the Work Order detail view or on the Task List view. This will begin the upload process.
- After the Service Report is successfully submitted, refresh the Work Order (via pull-torefresh) to display status updates and changes to the Required Document list that may have occurred due to submission of the Service Report.
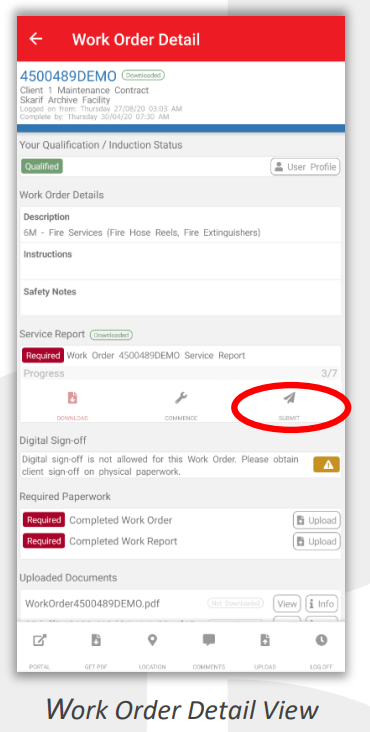
As Service Reports can include multiple photos, they can take some time to submit. Upload progress can be seen in the Sync List. Please be patient.
11.5 Additional information regarding Service Reports
- Service Reports for multiple Work Orders can be completed at the same time. Simply log on to additional Work Orders on the same site, commence a service report on any of those Work Orders, and an option will appear allowing you to complete them in a combined Task List.
- Assets can be filtered based on ‘Incomplete’, ‘Passed’, ‘Failed’. Tap the down arrow button on the Task List to expand the options.
11.6 Viewing Asset GPS Location
Where an Asset GPS location is available for an asset, it can be viewed in two places:
-
Via Task List - Tap the ‘View Map’ button on the Task list. This will show a map of the site with a pin for each asset that has GPS coordinates added.
-
Via Question List – Tap the ‘View on Map’ button on the Question list. This will show a map with a single pin for the selected asset.
11.7 Submitting an Asset GPS Location
An asset GPS Location can be submitted back to CBC. This will update its location for you and for future technicians servicing the asset.
- Ensure your device has Location permissions enabled for the CBC CMMS Technician App.
- From the Task List, tap on the desired Asset.
- Tap the ‘Add Map Coords’ option. This will display a map with a pin at your current location.
- If necessary, tap and hold on the red pin icon and then drop to the correct location.
- Tap the ‘Submit Location’ button.
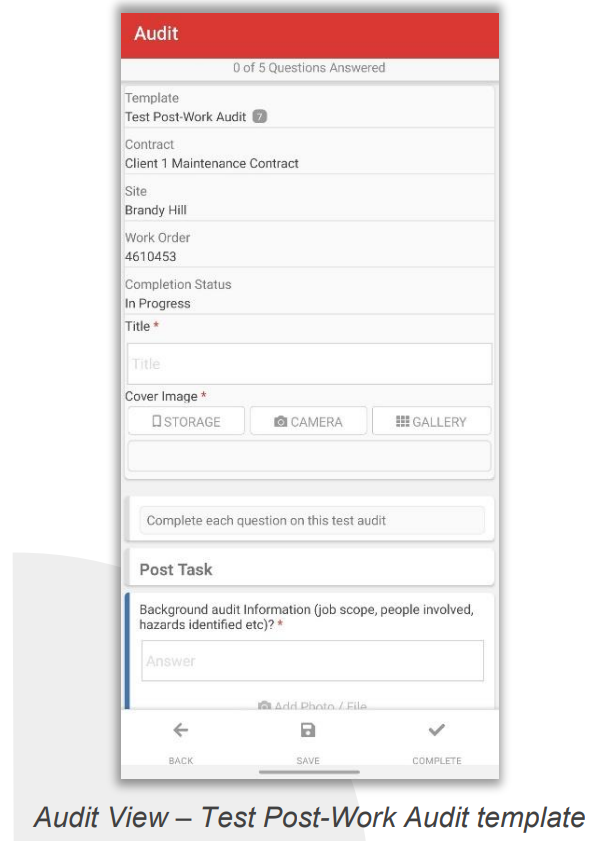
12. Completing an Audit
12.1 Starting a New Audit
- From the Work Order Details view, tap the ‘New Audit’ button to bring up the ‘Select Audit template’ pop-up form.
- Select the Audit template you wish to perform.
12.2 Continuing an Audit
- From the Work Order Details view, find the Audit you wish to continue in the Audit List.
- Tap the ‘View’ button to download and re-commence the Audit.
12.3 Completing an Audit
- Enter a Title.
- Where required for the template, select a Cover Image. This will be used on the front page of the Audit PDF when completed.
- For each response on the Audit, enter an appropriate value or select a file.
- Additional comments or photos can be included by tapping the ‘Add Comment’ or ‘Add Photo / File’ button under each response.
- When complete, tap the ‘Complete’ button to submit changes to CMMS, or tap the ‘Save’ button to save changes but continue working.
12.4 Downloading an Audit PDF (in View Mode)
- From the Work Order Details view, find the Audit you wish to download a PDF for in the Audit List.
- Tap the ‘PDF’ button to initiate generation and download of the PDF. This can take a little while as the PDF is generated on the server and involved compiling all images and responses.
When saving an audit, the in-progress audit saves with the provided responses and the audit can access by other users both via the app and via the CMMS Portal.
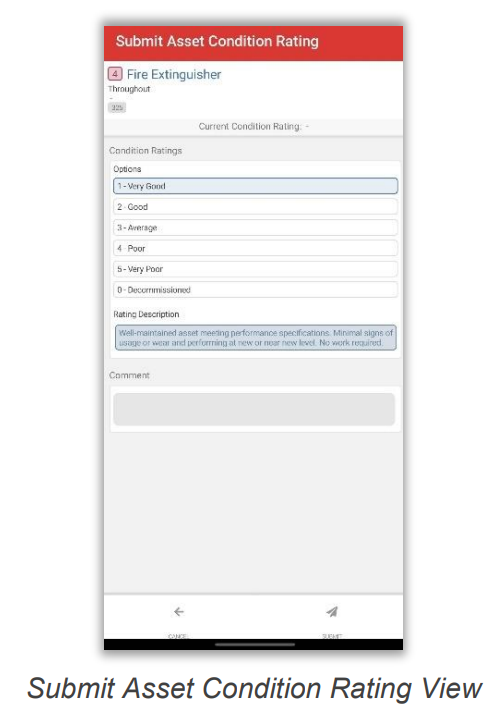
13. Submitting an Asset Condition Rating
The App now allows users to record and submit the condition rating based on the functionality and visual appearance of the asset. The submitted condition rating will register as a proposed rating, and the CBC contract team will assess the rating and approve.
The available condition ratings are based on the contract. Some contracts may have a different rating system, and also some contracts do not have the condition rating available.
13.1
- Under Asset section on the Work Order Detail view, tap the ‘Rate’ button.
- On the ‘Submit Asset Condition Rating’ view, select the appropriate rating for the asset.
- Enter a comment to provide more information if necessary.
- Tap the Submit button to propose the condition rating.
14. Using the CBC CMMS Technician App Offline
The App now allows users to utilise the app when no internet connection is available. Where an action is performed, data is stored on your device in a Sync List, awaiting submission once an internet connection is restored.
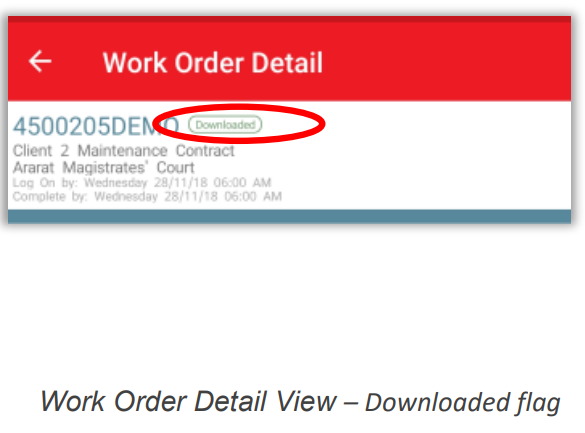
Offline functionality requires Work Orders to be downloaded in advance so that necessary data is available. Once a Work Order is downloaded to the device, the ‘Downloaded’ flag will appear next to the Work Order number on the Work Order List and Work Order Detail view.
You need to remain logged in to utilise offline mode. If you log out of the App, you will be unable to use it until an internet connection is restored and you log in again.
Offline functionality described here is only available on the CMMS Technician App. the Device Offline mode is not supported via Portal on web browsers on Mobile devices.
14.1 Functions available when offline
- Log On and Log Off Work Orders.
- Digital sign-off.
- Upload paperwork.
- Perform Service Reports.
- Comments.
14.2 How to download a Work Order before going Offline.
Simply navigate to the Work Order Detail view, by tapping a Work Order in the list, when your device is connected to the internet.
- Ensure the green ‘Downloaded’ flag appears next to the Work Order number to indicate the Work Order is ready to use in Offline mode.

15. Device Location Permissions
The CMMS Technician App uses Location permissions to capture the location of the technician when they log on and off Work Orders to ensure the user is at the location of the site. When a user is logged on, user location is also monitored, on your device only, to check if the user has left site for purposes of reminding you to log off. To confirm, user location data is only communicated to the CBC server at the actual point of log on and log off, and only if you allow the app to do so. The Location permission can be disabled if necessary. The technician may disable the Location permissions if they do not wish to disclose the location information to CBC.
15.1 iOS Device
- Open your Device settings.
- Tap the ‘Privacy’ option and tap the ‘Location Services’ option.
- Scroll down to the ‘CMMS Technician App’.
- Tap the ‘While Using the App’ or ‘Always’ options to enable Location.
15.2 Android Device
- Open your Device settings.
- Tap the ‘Apps’ option.
- Scroll down to the ‘CMMS Technician App’ from the App list, and then tap on the ‘Permissions’
- Tap the ‘Location’ option.
- Tap the ‘Allow all the time’ or ‘Allow only while using the app’ to enable Location permission for the CMMS Technician App
- Never: Prevents access to Location permissions.
- While Using the App: Allows access to the Location permission only when the App is in use.
- Always: Allows access to the Location permission when app is in the background.
16. Additional Apps
| NAME | DESCRIPTION | PLATFORM |
|---|---|---|
| Microsoft Office Lens | Office Lens trims, enhances and makes pictures of whiteboards and documents readable. Office Lens can convert images to editable Word and PowerPoint files too. Office Lens can be used to photograph paperwork and turn it into neatly cropped sizes for good readability. | iOS Android (opens in a new tab) |
| Adobe Reader | Adobe Acrobat Reader is the free, trusted leader for reliably viewing, annotating, and signing PDFs. | iOS (opens in a new tab) Android (opens in a new tab) |
| Adobe Fill & Sign | The free Adobe Fill & Sign app lets you fill, sign, and send any form fast. You can even snap a picture of a paper form and fill it in on your phone or tablet. Then e-sign and send. No printing or faxing needed. | IOS (opens in a new tab) Android (opens in a new tab) |
17. Android Devices: Accessing Device Internal Storage
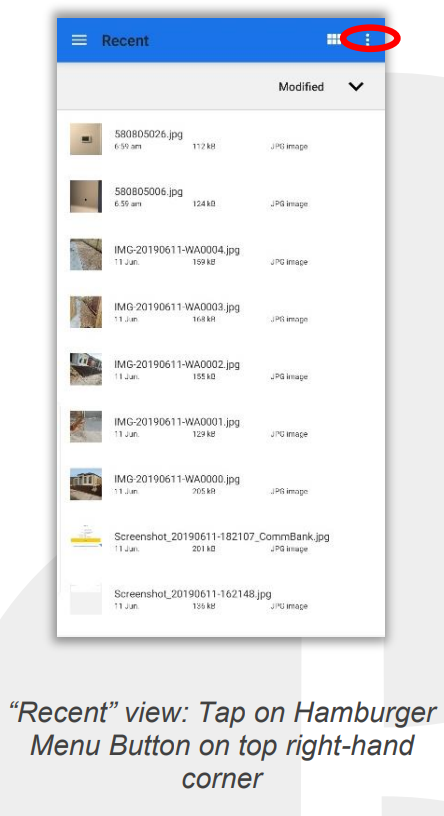
17.1 Starting from the Upload Document view, tap the ‘Storage’ button. This will display the Android file selection app. By default, this will show the Recent files.
- For older Android versions, you may need to unhide the Internal Storage option by tapping on the menu button (three dots, vertical) on the top right-hand corner and select ‘Show Internal Storage’.
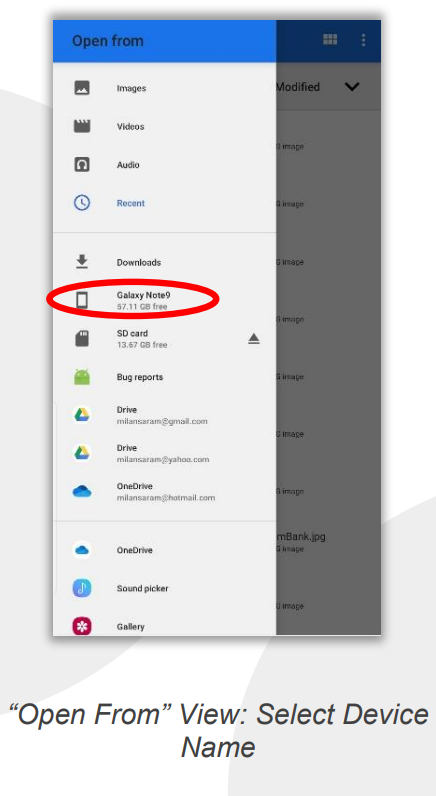
17.2 Tap the top left menu button (three lines, horizontal), and your device Internal Storage drive will be visible.
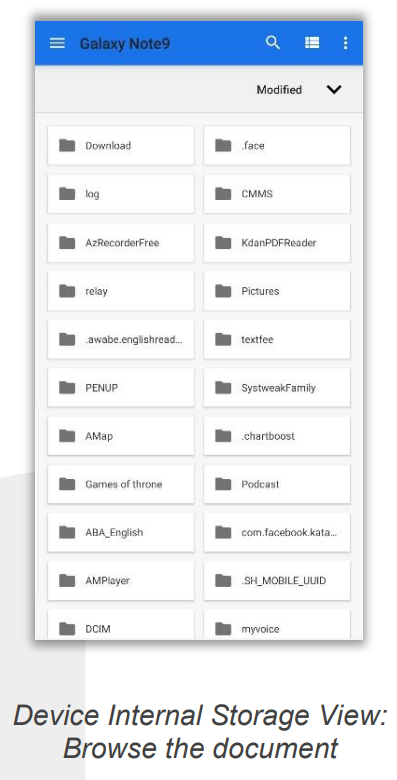
17.3 Select the internal storage option (usually named for the device you have, such as ‘Galaxy Note 9’) to begin searching for files on your device.
18. Saving your Password for Easier Login
18.1 iOS Device
To use this feature, you are required to have an Apple ID and have logged into the iCloud settings in your iOS device.
- Enable iCloud Keychain in the device’s settings.
- From the Home Screen, tap the ‘Settings’ icon.
- Tap your name on the top of the menu screen.
- Tap the ‘iCloud’ option.
- Tap the ‘Keychain’ option and enable the ‘iCloud Keychain’ by turning on the toggle.
- Enable AutoFill Passwords and enter details for the account.
- From the Home Screen, tap the ‘Settings’ icon.
- Navigate to ‘Password and Accounts’.
- Tap the ‘Website and App Passwords’ option.
- Tap the ‘+’ button.
- Enter the website (cmms.cbcgroup.com.au), Username, and Password, and then tap the ‘Done’ to save.
- Enable ‘AutoFill Password’ by turning on the toggle.
- Log in with Saved password.
- From the CMMS log in page, tap the username field.
- Tap the ‘Password’ on the keyboard and select the correct account to log in.
18.2 Android Device
To use this feature, you are required to have a Google account and have logged into your Google account on your Android device.
-
For Android OS Devices
-
On your Android Device, open your device’s Settings.
-
Tap the ‘Google’ option, and then tap the ‘Google Account’ (i.e. name@gmail.com) option.
-
Tap the ‘Manage your Google Account’ option and then select the ‘Security’ option, just below the Google account.
-
Scroll down to "Signing in to other sites” and tap the ‘Password Manager’.
-
Tap the Password Manager Cogwheel.
-
Turn on ‘Offer to save password’.
-
For Samsung OS Devices
-
On your Samsung Device, open your device’s Settings.
-
Tap the ‘Accounts and Password’ option, and then tap the ‘Account’ option.
-
Tap your Google Account (i.e. name@gmail.com), and then tap Google Account.
-
Tap the ‘Security’ option, just below the Google account.
-
Scroll down to "Signing in to other sites" and tap the ‘Password Manager’.
-
Tap the Password Manager Cog wheel.
-
Turn on ‘Offer to save password’.
-
Log into CMMS by using the saved password.
-
From the CMMS log in page, tap the username field.
-
Authorise the device security (fingerprint or Face ID).
-
Select the Account and tap log in.